
Map the beds and the water source first
Measure each bed and note where the water source sits relative to the garden. Sketch the route from the source to the beds, including any paths, walls or planting you need to cross or avoid. Mark where you want access points for valves, the filter, the regulator and end flushing.
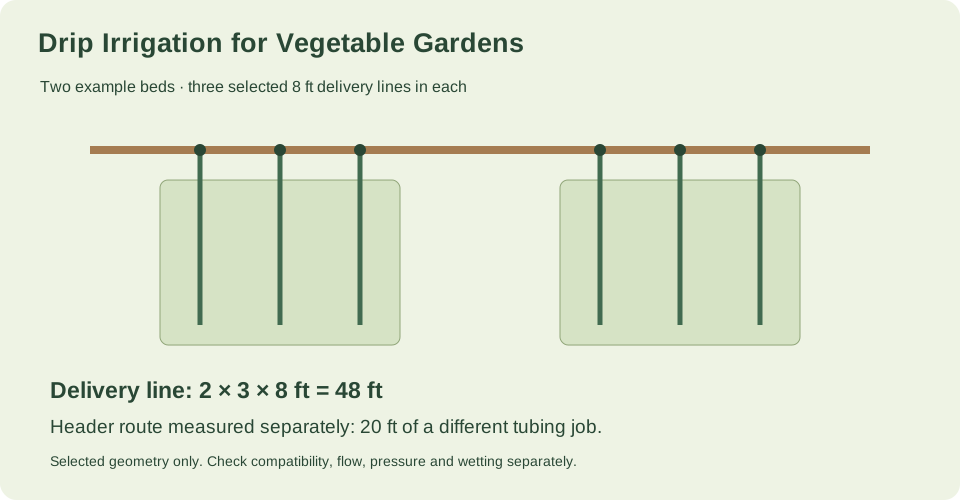
Decide which delivery lines you intend to run in each bed and measure their lengths. These are your chosen lines, not a spacing rule for any crop. Record the count and length of each line so the worksheet stays checkable.
- Measure every bed and the distance from the water source.
- Sketch the header route and mark valve, filter, regulator and flush access points.
- List each chosen delivery line with its measured length.
Source context: University of Maryland Extension
Separate header tubing from delivery tubing
A drip layout connects supply, a compatible filter and pressure regulator, a header, and delivery lines. Backflow protection must be considered for the water source. Treat the header and the delivery lines as separate product lines in your worksheet, since they may need different fittings, ratings or sizes.
In the supplied example, two beds each use three chosen 8 ft delivery runs, giving 48 ft of delivery line. A separate measured header route is 20 ft. The example also selects six takeoffs and six line-end closures. These are user assumptions for a shopping worksheet, not recommended line spacing or hydraulic capacity.
- Enter header tubing and delivery tubing as separate rows with separate quantities.
- Match takeoffs and end closures to the delivery lines you selected.
- Keep the measured tubing length distinct from any flow, pressure or runtime figure.
Source context: University of Maryland Extension
Check specifications and compatibility
Emitter and line selection depend on soil wetting, crops, product specifications and supply conditions. Read the product labels and confirm that the filter, regulator, header, takeoffs and delivery lines are compatible with each other and with your supply. Package label units govern volume conversions.
A measured tubing length is not a flow, pressure or watering-duration calculation. Use the product ratings and your observed wetting to set the actual layout and runtime, and note where a decision depends on a specification you still need to confirm.
- List the filter, regulator, header, takeoffs, delivery lines and closures with their stated specifications.
- Confirm compatibility between each part and the water source.
- Record supply flow and pressure from your own measurement or supplier information.
- Note any specification still unconfirmed before purchasing.
Source context: University of Maryland Extension
Flush, observe and record
Plan access for end flushing and for checking each delivery line. After installation, observe how water wets the soil around the selected lines and write down what you see, along with any changes to the layout or runtime.
Keep a simple maintenance record in your garden journal: date, what was checked, what was flushed, and any adjustment made. Observations over time help you refine the plan without treating the first layout as fixed.
- Flush each delivery line at the end and note the date.
- Record observed wetting and any runtime or layout changes in the journal.
- Review the record before changing parts or adding lines.
Source context: University of Maryland Extension
Check your measured example
Selected geometry for a shopping worksheet, not recommended line spacing or hydraulic capacity. Two beds each use three chosen 8 ft delivery runs, with a separate measured 20 ft header route.
| Quantity | Calculated result |
|---|---|
| beds | 2 |
| selected delivery lines per bed | 3 |
| selected line length ft | 8 |
| delivery line total ft | 48 |
| separate header tubing ft | 20 |
| selected takeoffs | 6 |
| selected line end closures | 6 |
The example is a shopping worksheet: two beds with three chosen 8 ft delivery runs each give 48 ft of delivery line, plus a separate 20 ft header route, six takeoffs and six end closures. It is selected geometry, not recommended spacing or a hydraulic design.
Example inputs explain the method. Review the source context, chosen cultivar and actual site before planting or ordering.
Your before-you-plant checklist
- Bed and water-source locations measured and sketched.
- Header route and delivery lines drawn separately.
- Filter, regulator, takeoffs and closures checked for compatibility.
- Backflow protection considered for the water source.
- End-flush access planned and observations recorded in the journal.
Questions that come up while planning
Can I combine header and delivery tubing into one order line?
Keep them as separate product lines. They serve different roles and may have different specifications, so separate rows make compatibility checks and quantities easier to verify.
Does 48 ft of delivery line tell me how long to water?
No. Tubing length is a measured quantity, not a flow, pressure or watering-duration calculation. Runtime depends on product ratings, supply conditions, soils and observed wetting.
What should I record after installing the lines?
Record the date, which lines were flushed, observed soil wetting, and any runtime or layout changes. Review the record before adjusting parts or adding lines.
Sources & method
Horticultural guidance is linked to its original source and regional context. Geometry and unit conversions are calculated separately. Read how we prepare and check a page.
- Drip IrrigationUniversity of Maryland Extension